Downgrade CUDA for Tensorflow-GPU

*Disclaimer* :This is an old post. Try at your own risk. Few people reported its working and few the other way round.
This short guide helps to understand how to downgrade the CUDA version in Ubuntu 18.04 OS. No background knowledge is required for this. The following operations are carried on distribution : 18.04 and architecture : x86_64.
In order to use the tensorflow-gpu for training, the CUDA version should be compatible with following setups:
Python VersionCompiler (GCC)Build Tools (Bazel)cuDNN(CUDA Deep Neural Network library)
The official tensorflow website has published a compatibility version list to make things easier. The following list can be checked out from following link.
https://www.tensorflow.org/install/source#gpu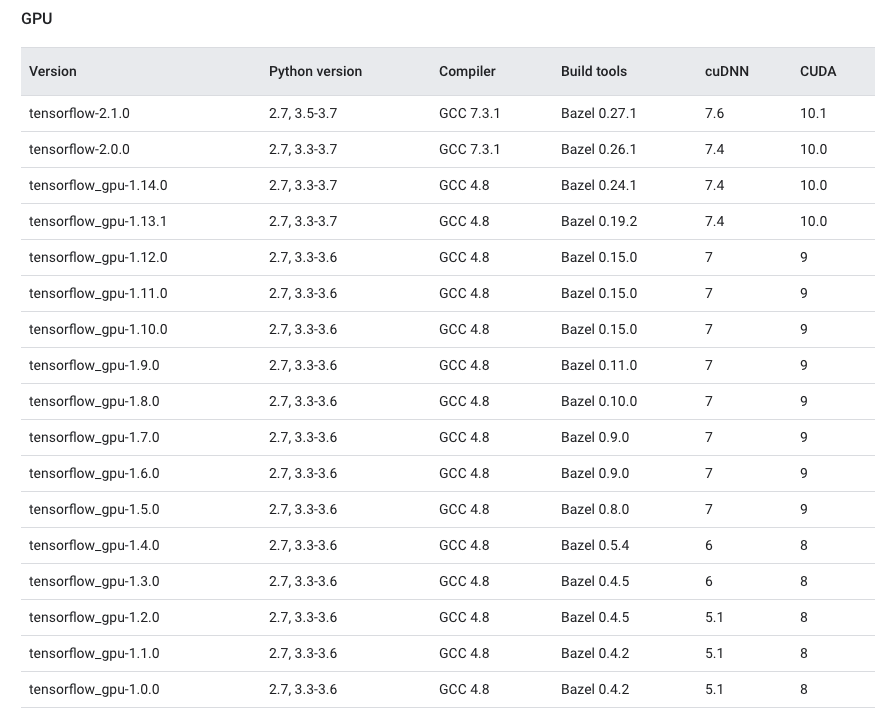
The steps that I would be describing can be summarised in detail as below:
- Auto-remove and Clean existing CUDA
- Download and Install CUDA
- Set Environment variables
- Download and Export CuDNN
- Test
Auto-remove and Clean existing CUDA
So the first thing is to auto-remove and clean existing CUDA version on the OS.
Download and Install CUDA
Next, is to download the required package from location. In this write up, I have consideredCUDA-10.0 based commands. Any other versions can be downloaded in similar way by replacing the versioning number. The following command helps in downloading the package from the location, unzipping and installing the package.
Set Environment variables
Exporting the paths to required location helps in accessing the libraries when the compiler needs it. Copy paste the below commands to do so.
The steps that are to be taken to remove and install the required version of CUDA is finished. Now we will head towards installing the CuDNN version. These are again libraries to support Deep Neural Network architecture computations on GPU.
Download and Export CuDNN
The CuDNN version can be downloaded from the link given in the comment section. The older versions will be archived and login as to be required. Note down the compatible version of cuDNN and proceed with the download. After downloading, change the directory to where these downloaded files are present and unzip it. Then, export the required paths to CUDA-10.0 paths. Downloading , unzipping and exporting can be performed by following below commands.
Test
Now the final stage, that is to run the test and see the presence of the required CUDA version on the screen. Note the runtime version can be different than the driver version for CUDA. The test scripts can be executed by following commands
NOTE:
After downgrading the CUDA, the system should never be upgraded or updated when the Linux-Ubuntu system prompts. If it is upgraded, then the system automatically removes CUDA-10.0 and installs the highest available drivers for GPU.
THANK YOU!